Showing posts with label Quick and Easy. Show all posts

Sunday, March 9, 2014

Egg & Canadian Bacon Muffins


Egg muffins are one of the breakfasts I enjoy when I want to have a quick “grab and go” breakfast on hand during the week. They’re quick and easy to whip together and they store perfectly in the refrigerator. Admittedly, I haven’t tried freezing these – but I can’t see how one couldn’t especially if they’re left to defrost before reheating.

I prefer to cook these egg muffins in disposable aluminum muffin pans instead of my regular standard metal muffin tins. I find in regular muffin tins the egg tends to brown up a lot more and dry out – which is fine if eaten the same day. But I find when reheating the next day, the eggs become rubbery. When cooking in a disposable aluminum pan I find the eggs keep some moisture to them and reheating them keeps them from getting rubbery.

I prefer to serve these over toast with a bit of sriracha and ketchup.

2 Points Plus. Serves 3. 2 Egg Muffins/serving.
Ingredients:
-          1 ½ cups Egg Beaters or liquid egg substitute
-          6 slices Canadian bacon (I used the Land O’Frost Sweet Country Maple)
-          6 slices Hormel Turkey Pepperoni
-          Mrs. Dash Extra Spicy (or any seasoning of your choice)

Preheat oven to 350 degrees.

Spray each muffin tin with non-stick cooking spray.

Chop up 1 slice of turkey pepperoni and Canadian bacon and place into the bottom of a muffin tin. Repeat for the remaining tins.

Pour ¼ cup egg beaters into each muffin tin.  Sprinkle the top with the seasoning of your choice.

Place muffin tins onto a cookie sheet (incase of any overflow) and place into preheated oven and bake for roughly 15-20 minutes until egg muffins are cooked through.


Sunday, January 26, 2014

Sautéed Banana topped French Toast, Eggs & Sausage

French toast is one of my favorite breakfast dishes, but it’s also a breakfast dish I don’t have very often. Typically I make it when I’m craving it … and one night I decided to make French toast for dinner for my boyfriend and I. I of course, make my French toast using lighter ingredients (light bread and egg substitute).  It comes out perfectly, is delicious and is filling.

I placed a little more than 1/3 cup of egg substitute in a bowl, added in 2 tablespoons of skim milk, a dash of vanilla and a sprinkle of cinnamon. Beat it together, then dipped three slices of light bread and cooked it up in a nonstick skillet.  Since I had a banana that was well past ripe, I decided to make myself a quick sautéed banana cooked in a non-stick skillet with a sprinkle of cinnamon. Once done I layered that over my French toast.

The remaining egg mixture (I used ½ cup total) I decided to make myself a little scrambled eggs and served the dish alongside 3 turkey sausage links.

It was a delicious meal which was only 7 points plus. Quite a bang for my buck!

Sunday, January 19, 2014

Taco Junk


Ahh, Taco Junk! I never knew how amazing this dish was until I finally gave it a try. I’ve tried trashy taco soup in the past, but that was soup and not like “taco mix”. I stumbled upon this thanks to Pinterest. There was a picture pinned of canned food items lined up alongside taco and ranch seasoning, so I clicked on it because I was curious.  And I’m glad I did.

Not only is this dish exceptionally easy to whip together, but it’s cooked in the crock pot and the end result is utterly delicious. So delicious that I’ve been asked on multiple occasions (in a week’s time frame) as to when I was going to make it again.  It’s that good; that I’m pretty sure it’s going to be on this upcoming week’s dinner menu.

The original recipe has all canned ingredients being used with your choice of either ground beef or turkey, but I switched it up just a little bit as I do with all my cooking.  I added in onion and McCormick Montreal steak seasoning, opted for frozen fire roasted corn and decided to not use the salsa that was listed in a few recipes.  The end result was a nicely thickened taco mixture, which as it sat away from heat got thicker and even more delicious. Definitely a winner for all taco lovers alike!

Serves 13. 3 Points Plus. ½ cup serving size.
Ingredients:
  • 20 oz. 93% lean ground turkey
  • 1 medium onion, chopped
  • 1 tsp McCormick Montreal steak seasoning (optional)
  • 14 oz can kidney beans, rinsed and drained
  • 14 oz canned black beans, rinsed and drained
  • 14 oz diced tomatoes, no salt added
  • 1 ½ cups frozen fire roasted corn (I used Trader Joe’s brand)
  • 1 packet Taco seasoning, reduced sodium
  • 1 package Hidden Valley Ranch seasoning mix

In a non-stick skillet combine onion, ground turkey and Montreal steak seasoning and cook together until browned and no longer pink.

Transfer meat and onion mixture to a crock pot. Add in taco seasoning, ranch seasoning, drained and rinsed beans, canned diced tomatoes and frozen corn.  Roughly 2 hours in give everything a gentle stir to get everything nicely incorporated.

Cover and cook on high for 4 hours.  Stir to combine all ingredients.

Serve immediately or allow to cool for 20-30 minutes to thicken up slightly.


Monday, January 6, 2014

Grilled Cheese

My niece and nephew were over this weekend. After they had been running around and playing I asked if they were hungry. I got two yeses across the board so I decided to make them something quick because I truthfully didn’t have anything prepared that would’ve been a quick small meal.  So I decided on grilled cheese sandwiches.  Theirs were made with your classic white bread and American cheese …. And I made one for myself on my light bread using fat free american cheese.

This is a great, quick meal where I’m able to have a sandwich with my niece and nephew and not have to sit on the “sidelines” and have my niece or nephew wonder why auntie isn’t having lunch with them.

The greatest part this sandwich is ONLY 3 points plus values!  How? Well, I use light Italian bread.  I buy the store brand because it’s cheaper but I do know Country Kitchen makes a version which is also 1 points plus value. Brand names differ region to region but if you can find a Light Italian they’re typically the same calories/points plus value wise.  For cheese … I use 1 slice of fat free American. Butter? I use a few sprays of spray butter on each side of my bread and toast it up until nice and crisp.

I’ve even jazzed my sandwich up in the past with some deli meat or if I want to keep it simple and light I’ve even added slices of tomato with some black pepper to season it.

QUESTION:
Are you a grilled cheese fan?

Monday, December 30, 2013

Raspberry Peanut Butter Balls / Buckeyes


This year I decided to make cookie trays for family and friends. Initially peanut butter balls weren’t on my list of things to make, but when my original idea using my PBCrave Razzle Dazzle Peanut Butter didn’t fit the bill, I decided to whip up a quick batch of these “test run” peanut butter balls.

Truth be told they were SO good, I made a second batch two days later and ended up incorporating these delicious desserts into my trays … and they were one of the show-stopper desserts. They’re your classic peanut butter ball but with a unique twist which makes them truly remarkable.

In case you’re not aware, Razzle Dazzle is sold and made by PB Crave.  The peanut butter itself is a natural peanut butter, which is a blend of red raspberries, wild honey, white chocolate and a delicious dark chocolate flavor.  Unlike typical natural butters this one is actually relatively thick and doesn’t need to be stirred together to reincorporate the oils into the butter.

The points plus/calories associated with each ball truly depends on the amount made. The first batch I got roughly 45 balls, whereas the second batch I made, I got over 60.

Serves 60. 3 Points Plus Values.
Ingredients:
  • 1 16 oz. jar PB Crave Razzle Dazzle
  • 3 cups powdered sugar
  • 1 tsp vanilla extract
  • ½ cup butter, softened at room temperature
  • 2 tbsp Crisco
  • 12 oz semi-sweet chocolate chips

In a large bowl add in butter and the full jar of Razzle Dazzle peanut butter. Using a handheld mixer, beat the mixture together until smooth and fluffy.

Drizzle in vanilla and add in powdered sugar 1 cup at a time. Blend until the mixture forms a thicker batter.

Line a tray with wax paper, pick up a large rounded teaspoon amount of mixture and roll into a ball. Place the balls on the wax paper and repeat until all mixture is incorporated into balls.

Place the tray into the refrigerator to harden for at a minimum 1 hour.

Before removing the peanut butter balls from the refrigerator, in a microwave safe bowl, combine the semi-sweet chocolate chips and Crisco. Microwave in 30 second intervals, blending the mixture together with a spoon in between.  I found after 3 trips into the microwave, my chocolate mixture was perfectly melted.

Using a toothpick, pierce the balls and dunk in the chocolate. Return the ball to the tray – repeating until all balls are coated. You can use another toothpick to smooth over the pierced holes or you can leave as is.

Return the tray filled with dipping peanut butter balls to the refrigerator to harden. Allow to harden for a minimum of 1-hour.

Sunday, December 29, 2013

Spaghetti Squash Bake with Turkey Meatballs

I have developed a true love for spaghetti squash, although I will admit having it the same way over and over again can get a little redundant and boring. So with that I ended up switching it up a bit, using the same ingredients but adding some cheese atop. It turned out absolutely perfectly. The spaghetti squash crisped up just slightly on the outside and the cheese was a perfect touch. Considering this was using some of my leftover meat sauce I had made it was also a great way to use up some leftovers in a new and unique way.

My meatballs are actually frozen turkey meatballs from Trader Joe’s.  I pick these up every once in a while at Trader Joe’s because my boyfriend and I just genuinely like these! I’m usually not a frozen meatball fan (I prefer homemade) but these are tasty and perfect for a quick meal. I’ve heard from a few that the sodium level is too high for their liking – but I feel as though these aren’t an item I eat all the time, so a higher sodium level isn’t going to be a damper.

To make my spaghetti squash bake, I layered spaghetti squash into the bottom of a small baking dish. I layered ½ cup of homemade meat sauce over the top, then sprinkled the top with 1/3 cup of fat free mozzarella.  I then baked it in the oven for roughly 15-20 minutes until the cheese was nice and melted.

The greatest part was my entire meal was only 9 points plus!

QUESTION:
Have you ever had spaghetti squash bake?

Tortilla Pizzas

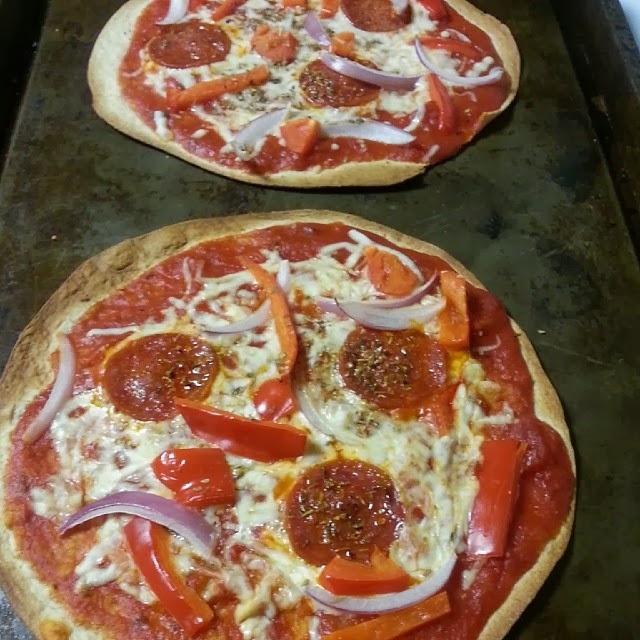
Pizza is undoubtedly one of my favorite foods. I’ve made pizza like this for myself in the past, but on the night I made these, I was glad I had tortillas on hand. Why? Well, I purchased the wrong prepared pizza crust (I wanted the thin crust but bought regular crust) so I made a pizza for my boyfriend and made a “point comfortable” pizza for myself – or rather TWO pizzas! The only thing I was missing was the classic thick pizza crust, but nonetheless the flavor was there and that’s all that matters!

Making tortilla pizza is truly simple and they can be versatile depending on the flavors you’re looking for. I’ve used bell peppers, onions, banana peppers, turkey pepperoni, turkey sausage and hamburger. This time around I used fresh bell pepper, fresh red onion, and turkey pepperoni. I garnished it wit a sprinkle of oregano and a tiny dash of garlic powder.

I used ¼ cup of Barilla Traditional Pasta Sauce on each tortilla round and split 1/3 cup Kraft fat free shredded mozzarella over each tortilla, then doctored up with my pepperoni and veggies.

The greatest part? Both pizzas were only 6 points plus values.

QUESTION:
Do you like homemade lower point/calorie stabs at pizza?

Friday, December 27, 2013

Cabbage, Beet and Onion Salad

Cabbage, beet and onion salad is a dish my mother made often growing up. It was a very simple salad, but it was a perfect complimentary meal against certain dishes. The salad itself is simple, refreshing, tart, crisp and even a perfect meal on its own or alongside dinner.

Typically I would use a head of cabbage, but since I was looking for something quick I opted to pick up a bag of coleslaw mix. I would recommend picking up a bag of shredded cabbage (without carrots) but since coleslaw mix with carrots is all that my grocery store had available, it’s what I picked up. The carrots don’t necessarily change the dish it just gives it a different crunch.  Nonetheless it’s delicious and typically a crowd pleaser.

I enjoy this the day I make it, but I feel it tastes so much better the next day because it gets to “marinate” in the refrigerator. The cabbage also softens up a bit.

Serves 7. 1 Points Plus Values. ~3/4 cup serving.
Ingredients:
  • 1 bag of coleslaw mix OR 1 small head of cabbage, sliced thin
  • ½ small onion, sliced
  • 8 oz fresh beets (or canned), sliced
  • 4 tbsp Red wine vinegar (or less depending on taste)
  • 1 tbsp olive oil
  • Pepper, to taste
  • Salt, to taste

Add coleslaw mix, sliced onions and sliced beets to a large bowl. Sprinkle with black pepper and a dash of salt.

Drizzle in olive oil and red wine vinegar. Toss to combine.

The beets will change the color of the salad to a slightly purple shade.  Taste test and adjust seasonings (salt, pepper and red wine vinegar).

Sunday, November 24, 2013

Quick & Easy Jamaican Rice and Beans


This is my quick and easy way to make Jamaican Rice and Beans. Typically when making rice and beans, I’d soak dry red kidney beans in water overnight, then boil them the next morning and when done incorporate my rice, onion, coconut milk, seasoning, and water (that the beans were boiled in) together to cook together until the rice was done. Although … somebody (*raises hand*) forgot to soak the beans so authentic rice and beans was out of the question. So I opted to go with the quick and easy method … using my rice cooker.

It’s quite simple and delicious. I admit something about boiling it all together on the stove gives it that much more pizzazz but this is good and if no one saw it coming out of a rice pot, they truthfully wouldn’t know.

Serves 9.  9 Points Plus Values. 1 cup serving. OR Serves 18. 5 Points Plus. 1/2 cup serving.
Ingredients:
  • 4 cups uncooked white rice (I use Goya Golden Canilla Parboiled Rice)
  • 15 oz canned Red Kidney Beans, drained and rinsed
  • 14 oz canned Light Coconut Milk
  • 1 small onion, sliced
  • 6 ¼ cups water (since you are using the light coconut milk, you need to cut back on the water because you have 1 ¾ cup of light coconut milk – in total you want 8 cups of liquid as it’s normally 2 cups water per 1 cup rice)
  • 1 tsp salt
  • ½ tsp pepper
  • 2 pieces of Thyme (optional)
Add rice, beans, coconut milk, water, onion, salt, pepper and thyme (if using) to rice pot.

Set rice pot on to cook, “set it and forget it.”

Your dish will be done when the rice pot is finished cooking. Make sure to remove the sprigs of thyme before serving.

Serve up with one of your favorite dishes (I recommend curry cabbage, curry chicken stewed chicken or jerk pork/chicken).


Thursday, November 21, 2013

Dinner: Broccoli & Carrot Alfredo w/ Chicken Cutlet

This is a quick and easy dinner I whipped up the other night. I knew pasta was on the dinner menu, but I had no real other inclination as to what to do with it … until I saw a jar of Ragu Light Alfredo sauce. Alfredo pasta it shall be!

This was a rather quick, easy and filling meal I was able to whip up in less than 20 minutes.  I had some Tyson Lightly Breaded Chicken Strips that I popped into the oven to crisp up while I set a pot of water on to boil. I was boiling up some Al Dente Carba-Nada pasta for myself.  I popped a bag of fresh broccoli and carrots into the microwave and let them steam.  When the pasta was done, I drained it, added in some black pepper, tossed in the broccoli and carrots, then added in some Ragu Light Alfredo sauce. I actually made 2 servings, one serving for diner and another to have for lunch the following day.

Since pasta, without a protein is something I don’t eat; I weighed out 3 ounces of chicken and served that alongside my pasta dish.  It was delicious, filling and a perfectly different meal.  The entire plate was only 10 points plus values.

QUESTION:
Do you like alfredo pasta?

Wednesday, November 20, 2013

Garden Lites Pizza Souffle

After deciding to give the Garden Lites brand a second shot, I’ve been intrigued by some of the “newer” flavors, so I’ve been giving those a shot. One of the flavors on my list has been the Garden Lites Pizza Souffle and I was glad to find it at a local super Target.  I had it in the freezer for a couple weeks and decided to finally give it a whirl.

Pizza is one of my favorite foods and I’ll be honest when I say I was a little apprehensive. Pizza … soufflé … how exactly is this going to taste? The box describes the dish as “a savory veggie soufflé topped with our delicious pizza sauce & herbed mozzarella cheese.”

When it was done cooking in the microwave, I let it rest for a few minutes before taking the first bite and I have to say, this is DELICIOUS! The bottom part of the soufflé is a little wetter, but it’s not soggy, nor does it make it gross.  The sauce is so vibrantly flavorful that it really brings the dish to a whole new level. The cheese is like the icing on cake, where it really brings it all together. Out of all the Garden Lites I’ve recently tried (pumpkin spice & veggie chili and cornbread) this has to be my favorite.  The only downside … they’re not available at any location that’s a hop/skip away.

A serving (the whole 7 ounce container) is 200 calories or 5 points plus values. It’s delicious and relatively filling and could be suitable for a lunch alongside with a side salad.

QUESTION:
Have you tried any of the Garden Lites products? If so, what’s one you’d recommend trying?

Wednesday, October 30, 2013

Guilt Free Banana Cream Pie


Banana Cream Pie is one of those desserts that I have always favored and oddly enough it’s usually in the late summer/fall time that I enjoy it.  While grocery shopping my boyfriend picked up a box of banana cream pie mix while in the produce department.  I used that package many, many years ago, but I’ve grown to enjoy my version of banana cream pie a lot more. We decided that I’d make my version and we’d see if he liked it.

A few days later, I picked up the ingredients and made the pie a few hours before dinner so it could sit in the fridge and get nice and cold. Turns out it was a hit!  I simply love this pie, not only because it’s point comfortable, but because it’s so easy to make and you really don’t miss the full fat version.  Of course, if you wanted whipped cream you could add a few dollops of fat free or light cool whip to the top to seal the deal. But I personally enjoy it just like this.

Granted this is not really a “recipe” but I wanted to share a very point friendly dessert I like to make.

Serves 8. 4 points plus valus.
Ingredients:
  • Keebler Reduced Fat Ready Crust Graham Cracker Crust
  • Jell-O Sugar Free Banana Cream Pudding
  • 2 cups fat free milk
  • 1 banana, sliced

Slice banana and layer sliced banana along the bottom of the graham cracker crust.

In a medium bowl whisk together Jell-O Pudding and milk. Blend for roughly 5 minutes until the jell-o has thickened and there are no more clumps.

Pour the pudding over the bananas.  Place into the refrigerator for a minimum of 1-hour to chill down completely.

Friday, October 18, 2013

Autumn Chicken Pasta


I was inspired by a Skinnytaste recipe but decided to throw a spin on it since I had chicken out to cook and not sausage and ground beef.  I was actually at Trader Joe’s when I spotted the brussel sprouts and pulled up the Skinnytaste recipe to have a peak since I had never looked at the regular recipe before then (I’d only seen the picture of it).

Deciding since it was later in the afternoon and I didn’t want to head to my regular grocery store, I’d make due with what I had on hand and what I could pick up at Trader Joe’s.  With that a lot of the ingredients I used are Trader Joe’s brand, but comparable products can be picked up at a regular grocery store.

This was a delicious meal. Quite interesting with the brussel sprouts in it, and the flavor category was fabulous. Packed with flavor, a heaping serving and the leftovers were able to marinate a little further while in the refrigerator overnight.

Serves 6. 1 ¾ cup serving. 10 Points Plus Values.
Ingredients:
  • 3 tsp olive oil
  • 1 tbsp minced garlic
  • 1 1/8 lbs boneless, skinless chicken, cut into small chunks
  • 28 oz. can of Trader Joe’s Trader Giotto’s Low Fat Tuscano Marinara Sauce (you can substitute with another variation of low-fat marinara sauce)
  • 12 oz. spaghetti (I used Barilla White Fiber Spaghetti)
  • 10 oz. shaved brussel sprouts
  • ½ tsp salt
  • ½ tsp pepper
  • 1 tbsp Trader Joe’s 21 Season Salute
  • ½ tsp garlic powder
  • 3 tbsp water (optional)

Add raw chicken to a bowl, season with garlic powder a pinch of salt and a pinch of pepper. Toss to combine, stabbing the chicken with a fork to get the flavor into the chicken pieces.

Fill a large pot with salted water. Once brought to a boil, add in your spaghetti and cook until (I recommend) al dente.

In a large non-stick skillet, add 1 ½ tsp olive oil to the bottom of the pan. Once hot add in garlic and let sauté for roughly 30 seconds before adding in the brussel sprouts - season with remaining salt and pepper.

Saute the brussel sprouts for 5-7 minutes until they begin to soften.  If they begin to stick to the pan add in 1 tablespoon of water at a time until cooked through. Remove brussel sprouts from the pan and set aside.

In the same non-stick skillet, add the remaining 1 ½ tsp of olive oil to the pan. Once hot, add in chicken and let brown and crisp up on both sides until cooked through. Try not to move the chicken much on each side to allow it to brown and get some color.

Once chicken is cooked, combine with brussel sprouts and toss. Pour in can of sauce and begin to add spaghetti, tossing to ensure the whole dish is combined and coated with sauce.

Remove from the flame and enjoy!

Wednesday, October 16, 2013

Trader Joe’s “This Pumpkin walks into a Bar…” Cereal Bars

In honor of my pumpkin adoration, I picked up a box of Trader Joe’s “This Pumpkin walks into a Bar…” Cereal Bars. I personally have not tried any of the cereal bars at Trader Joe’s, so what better introduction to them than a pumpkin one?  Plus with a pun in its name (the same pun is in all the Trader Joe’s cereal bars names) it makes for a conversational piece.

When opening the package, I was rewarded with a nice pumpkin spiced scent. The bars are truthfully your average cereal bar – hearty, flavorful and they do the trick.  The bars are not overly sweet, which is appreciated because sometimes sweet first thing in the morning is not what I am looking for.  They have a nutty, whole grain characteristic to them as most cereal bars tend to have. The filling is not very sweet, but there is a nice underlying pumpkin flavor throughout the whole thing. It makes me feel a little “healthier” when eating this, over some of the other pumpkin bars out on the market this time of the year.  Regardless, this is yummy and I did enjoy it.

Each bar is 140 calories or 4 points plus values.

QUESTION:
Have you tried any of the cereal bars at Trader Joe’s?

Sunday, September 22, 2013

BBQ Chicken Rolls


I picked up the stuff to make pizza logs, but when it came time to make them I realized I forgot the pizza sauce and I did not have any in the cabinets. Since I didn’t want to open a big jar of pasta sauce, I decided to use my eggroll wrappers in a test recipe.  Since I had some leftover chicken in the refrigerator, I got a great idea for BBQ chicken rolls. BBQ chicken is a typically safe bet food wise (at least with my family) because buffalo chicken can be questionable for certain tastebuds.

These took about 5 minutes to prep everything, maybe 5-10 minutes to roll everything and 10-15 minutes to bake them.  Quite an easy meal to throw together, even on a whim!  They were delicious and a great meal. My boyfriend enjoyed them so much he kept going back for more. Winner!

Serves 15. 3 Points Plus Values.
Ingredients:
-          15 NaSoya Egg Roll Wrappers
-          1 medium onion, sliced
-          10 oz. cooked roasted chicken, shredded
-          8 tbsp Stubb’s BBQ sauce

Add sliced onion to a non-stick skillet and cook until tender. If onions begin to brown a little too much, add 2 tablespoons of water to let the onions steam a bit..  Add in chicken and combine with onions, then stir in bbq sauce so all chicken is evenly coated.

Spray a non-stick cooking sheet with non-stick spray.

Add a heaping tablespoon of chicken mixture to the center of an egg roll wrapper. Fold first corner in, fold eggroll over once (forward motion), fold in each side and roll forward. When triangle piece of wrapper is remaining, dampen the ends of your fingertips with water, smooth over the egg roll wrapper and seal shut. Place triangle side down on a baking sheet.  Spray the top of the rolls with non-stick cooking spray.

Bake in a 425 degree oven for 10-15 minutes. Turning halfway through to brown each side.


Thursday, September 19, 2013

Trashy Taco Soup


I first stumbled upon this recipe after reading over a post on Emily Noel’s blog.  My initial thought was what on earth is this trashy taco soup?  After reading over the general gist of the recipe (see original recipe here), I decided to throw the recipe into Recipe Builder to see how many points a serving would be. I tend to be a bigger fan of stews and since this was said to be on the thicker side I was all on board.  Going through the ingredients I had on hand, I decided I would switch the recipe up just a tad and I have to say, I LOVED the end result.  It was filling, delicious and the possibilities are undoubtedly endless because it can be switched up to cater to any craving one may be having.  Here’s how I switched up mine just a bit:

Serves 8. 1 cup serving. 6 points plus values.

Ingredients:
-          1 pound 93% lean ground turkey (or if you prefer 93% ground beef)
-          1 medium onion, diced
-          1 tablespoon minced garlic
-          14.5 oz canned diced tomatoes
-          10 oz. Rotel diced tomatoes & green chiles – original
-          15 oz. canned black beans, drained and rinsed
-          15 oz. canned small red beans, drained and rinsed
-          15 oz canned corn, no salt added
-          15 oz. canned tomato sauce
-          1 envelope McCormick Taco Seasoning
-          1 envelope Hidden Valley Ranch  dip
-          Trader Joe’s 21 Season Salute (or hamburger seasoning) - Optional

In a non-stick skillet over medium heat, cook together your ground meat, onion and garlic.  Season with 21 Season Salute or hamburger seasoning (if wanted).  Cook until onions are translucent and ground meat is cooked completely.

Transfer meat mixture to a Crock pot (or if you wish to cook it on the stove, transfer your meat to a soup pot).  Add in beans, Ro-tel tomatoes, diced tomatoes, black beans, red beans, corn, tomato sauce, ranch seasoning, and taco seasoning.  Mix together ingredients.

Set crock pot onto low, cover and cook for 6-8 hours.  45 minutes before serving I turned the crock pot off to allow the mixture to cool and thicken up just a tad.


Tuesday, September 17, 2013

Trader Joe’s Vegetable Samosas


I enjoy a number of Indian dishes and one of the items I truly enjoy is hands down samosas. I used to work with a father and daughter who would bring in homemade samosas to company pot lucks … and my love for them blossomed.  So needless to say, when I spotted these Trader Joe’s Vegetable Samosas I had to give them a go.

I decided to cook these up in the oven and have them for a late lunch.  They cook up and resemble homemade samosas.  While baking in the oven they do let off a little bit of oil residue, which when you’re eating makes your fingers a little shiny, but it’s nothing overwhelming. They’re packed with vegetables and flavor while they are also a little spicy. I found it to be a pleasant spice, but I shared these with my mother who thought it was a little too spicy for her taste.  I enjoyed my samosas with a side salad and it was a delicious meal.

A serving is 2 samosas, which is 170 calories or 4 points plus values.  I would suggest if the samosas are not going to be eaten in one sitting to not heat them all up because as they sit the crust does get softer. I hadn’t put them into the fridge (all were eaten in a day) but I think if they were put into the refrigerator they’d be soggy overnight.

QUESTION:
Do you enjoy vegetable samosas?

Friday, August 30, 2013

Dinner: Shake & Bake Pork, Potato, Corn & Apple Sauce


This was a delicious and filling dinner I whipped together one night for dinner. It was honestly the quickest and easiest meal to put together and I forgot how yummy Shake & Bake was!  This was truly a “walk in the door, assemble, set it and forget it” type of meal. Dinner was done in 40 minutes – which was the amount of time it took for the pork to cook through.

I started off the meal by trimming the fat off my pork chops. Rinsed them under water then dropped them into the plastic bag that comes with the shake and bake.  I shook each pork chop up individually and put them onto a baking sheet.  Into the oven they went with the timer set.

I peeled and husked some corn, put it in a pot with a splash of milk and set it on to boil.  I then took my potatoes, rinsed them and popped them into the microwave for 8 minutes.  Yes – did you know you can have a baked potato straight out of the microwave? It’s my go to method when I want a potato because it makes it simple and I don’t have to wait 40+ minutes for it.

When everything was done, I measured out my serving and dinner was ready to rock and roll!  What I had was 4 ounces of pork with shake and bake on it (6 points plus), a 7 oz potato (4 points plus), a corn on the cob (2 points plus) and ¼ cup unsweetened applesauce (0 points plus).  Overall 12 points plus – filling and delicious!

QUESTION:
What is a quick and easy meal you haven’t had in a while?

Thursday, August 29, 2013

Meat Sauce

One thing I really enjoy making is homemade sauce.  It’s pretty simple, it comes together on its own and I’m able to control what I put in it, which in turn controls the overall points plus value when the sauce is complete. I do make a few variations (meat, no meat, vegetables, etc.) but this is my staple “go-to” when it comes to meat sauce.  I find I can have an entire pot of sauce cooked and ready to roll in under 1 hour or I can let it simmer for a few hours.  Plus, the great thing with sauce is that it truly tastes better as it marinates in the refrigerator.

When I make sauce I make a huge batch (because why else make sauce?) and usually have folks over for dinner.  I always use some of it towards dinner, the remainder is used in other dishes during the week or I end up freezing it to take out whenever I need it.

Serves 24. ½ cup serving.  2 Points Plus Values.

Ingredients:
-          1 1/8 93% ground beef
-          1 medium onion, diced
-          1 heaping tbsp minced garlic
-          2 (29 oz.) cans Contadina Crushed Tomatoes
-          1 (14 oz.) can Contadina Tomato Sauce with Italian Herbs
-          1 (14 oz.) Hunts Fire Roasted, Diced Tomatoes, slightly drained
-          1 (14 oz.) Hunts Diced Basil, Garlic & Oregano Tomatoes, slightly drained
-          1 (6 oz.) Cento Tomato Paste
-          1/3 cup Reduced Fat Parmesan
-          2 tbsp brown sugar
-          Salt, pinch
-          Black Pepper, pinch
-          Red Pepper Flakes, pinch
-          2 tsp garlic powder
-          1 1/2 tbsp Oregano

In a large non-stick sauce pan, over medium-high heat, add ground beef and onion – season with salt and pepper. Cook the mixture breaking up the ground beef as finely as possible. Make sure to stir frequently so beef cooks evenly.  When half cooked, add in minced garlic.

When the beef has browned and cooked through, begin adding in your sauce. Crushed tomatoes, tomato sauce, diced tomatoes.  Stir to combine.

Add in parmesan cheese, garlic powder, oregano, and red pepper flakes. Stir until well combined.

Allow mixture to come to a slow simmer either covered or uncovered.  After roughly 20 minutes of simmering, slowly blend in the tomato paste. Make sure to blend the tomato paste in well to avoid large clumps.

Sprinkle brown into the sauce, and stir. As sauce thickens, taste and adjust seasonings. Typically I have to add more oregano, garlic powder, and salt.

Sauce can be simmered for 20 more minutes or up to 1 hour.

Sunday, August 25, 2013

Sandwich Bros. Gyro Sliders


After trying out the Sandwich Bros. Angus Burgers I decided to give the Sandwich Bros. Gyro Sliders a try.  I’m a fan of gyros every now and again, but since it’s hard to find Gyros in my area, unless I travel to get them, that these would be a unique and different treat.  I do on occasion make a chicken gyro at home, but … it’s true sometimes a gyro just isn’t complete without that burger/lamb meat combination.

The thing I like about these Sandwich Bros sandwiches is the fact they are all set and ready to eat. The only work involved is wrapping the sandwich up in a napkin and heating in the microwave for 40 seconds. It really simplifies a quick meal or snack without having to think much.

The gyro is, as are all the sandwiches in the line, encased in a soft pita bread pocket. The gyro meat is flavorful and juicy.  I will say it’s not truly complete without some tzatziki sauce, tomato and onion.  The pockets are small, but they can hold additional toppings, which is a plus.  I think these are good but they’re not as good as the Angus Burgers I tried.

Each sandwich is 150 calories – which translates to 4 points plus values.

QUESTION:
Have you tried the Sandwich Bros. Gyro Sliders?