Tuesday, December 31, 2013

Weight Watchers Under 20 Cookbook Haul


With the new Simple Start Weight Watchers plan rolling out, that means new products … and new cookbooks!  I’m a sucker for Weight Watcher cookbooks. So when I saw the new Under 20 at my meeting, I wanted to give it a go.

The cookbook is geared more towards Simple Start, which for those who’ve been members prior to this new roll out – it’s ultimately Simply Filling recipes. I’ve wanted to try simply filling in the past, but for one reason or another - the idea of making simply filling meals that my family and I could enjoy collectively was always mind boggling. I’m not sure why, but something about looking at a list of foods (power foods) and trying to come up with a meal was daunting. Not sure why, but it was.

So, I picked up the cookbook to jump start me into getting my thinking cap on tight. Seeing these meals ultimately made things “simpler” in my mind. Plus having a meal on the table in under 20 minutes is sometimes the way I like to roll!

The book has 200 dishes in it, which range from meats (beef/pork/etc.), to poultry and fish, to vegetarian dishes and even small plates (tapas). Ideally there is something for everyone in the book and I’m looking forward to giving a few of the recipes that caught my eye a go. Once I do try those out, I’ll gratefully share my thoughts/review on it.

QUESTION:
Have you purchased the new Under 20 cookbook in your Weight Watchers meeting?

Polish Potato Pancakes


Polish Potato Pancakes are one of my favorite “comfort foods” but they’re definitely one of those foods I only have once in a blue moon.  My grandmother made these often when I was a kid and as the tradition goes, my mother made these throughout my childhood into adulthood once in a while.

They’re actually quite easy to make, meaning the ingredients needed are very few, but the grating of the potatoes takes effort. Typically two potatoes in, my arm is sore and I’m wondering what I got myself into (haha).  There are many different graters on the market but the one I use is my grandmother’s old school potato grater (which I admit are hard to find, but can be found if you search for them), which essentially pulverizes the potatoes into little starchy potato “clouds”. While it pulverizes the potato I have to be VERY careful to not let it nick my hand because it’s not a pretty sight if it does.

These can be enjoyed any which way you like. Plain, with sour cream, or my absolute favorite way: with ketchup!

While I did calculate the points plus values for these, I was able to do so by measuring the oil I used in the beginning and measuring the oil I had leftover at the end. I assumed the oil that wasn’t present was absorbed into the end product.

Serves 10. 6 Points Plus per serving. (Serving size varies based on the amount made – I was able to make 20 pancakes making a serving 2 pancakes).
Ingredients:
  • 2 pounds peeled potatoes
  • 1 egg
  • 1 cup flour
  • 1 tsp baking powder
  • ½ cup vegetable oil
  • Salt, to taste
Place a grater over a large bowl and grate potatoes. Feel free to grate to your desired consistency. I prefer the old style grater which pulverizes the potato into a pillowy substance.

Place a skillet with ½ cup vegetable oil over medium heat.

Strain some liquid from your potato mixture. When the potatoes are grated they let off water, using a gentle hand allow the water to strain from it but do not push the liquid out of the potatoes because you want it to retain some moisture.

Combine egg, baking powder and ½ cup of flour into mixture. Combine, then add in the remaining ½ cup. You want the mixture to be loose but thick.

Using a heaping tablespoon, spoon the mixture into the hot oil and allow cooking until lightly golden on one side, flipping and cooking on the other.  Flip the pancakes over to cook for an additional 1-2 minutes per cooked side.  I find the pancakes need to be cooked additionally on each side before removing from the pan otherwise the inner pancake is raw and gummy.

When cooked, remove from the oil and set on a paper towel lined tray. Sprinkle with salt.

Continue cooking until all batter is used.


Monday, December 30, 2013

Raspberry Peanut Butter Balls / Buckeyes


This year I decided to make cookie trays for family and friends. Initially peanut butter balls weren’t on my list of things to make, but when my original idea using my PBCrave Razzle Dazzle Peanut Butter didn’t fit the bill, I decided to whip up a quick batch of these “test run” peanut butter balls.

Truth be told they were SO good, I made a second batch two days later and ended up incorporating these delicious desserts into my trays … and they were one of the show-stopper desserts. They’re your classic peanut butter ball but with a unique twist which makes them truly remarkable.

In case you’re not aware, Razzle Dazzle is sold and made by PB Crave.  The peanut butter itself is a natural peanut butter, which is a blend of red raspberries, wild honey, white chocolate and a delicious dark chocolate flavor.  Unlike typical natural butters this one is actually relatively thick and doesn’t need to be stirred together to reincorporate the oils into the butter.

The points plus/calories associated with each ball truly depends on the amount made. The first batch I got roughly 45 balls, whereas the second batch I made, I got over 60.

Serves 60. 3 Points Plus Values.
Ingredients:
  • 1 16 oz. jar PB Crave Razzle Dazzle
  • 3 cups powdered sugar
  • 1 tsp vanilla extract
  • ½ cup butter, softened at room temperature
  • 2 tbsp Crisco
  • 12 oz semi-sweet chocolate chips

In a large bowl add in butter and the full jar of Razzle Dazzle peanut butter. Using a handheld mixer, beat the mixture together until smooth and fluffy.

Drizzle in vanilla and add in powdered sugar 1 cup at a time. Blend until the mixture forms a thicker batter.

Line a tray with wax paper, pick up a large rounded teaspoon amount of mixture and roll into a ball. Place the balls on the wax paper and repeat until all mixture is incorporated into balls.

Place the tray into the refrigerator to harden for at a minimum 1 hour.

Before removing the peanut butter balls from the refrigerator, in a microwave safe bowl, combine the semi-sweet chocolate chips and Crisco. Microwave in 30 second intervals, blending the mixture together with a spoon in between.  I found after 3 trips into the microwave, my chocolate mixture was perfectly melted.

Using a toothpick, pierce the balls and dunk in the chocolate. Return the ball to the tray – repeating until all balls are coated. You can use another toothpick to smooth over the pierced holes or you can leave as is.

Return the tray filled with dipping peanut butter balls to the refrigerator to harden. Allow to harden for a minimum of 1-hour.

Turkey Pie


Transforming leftovers into a completely different dish is something I enjoy. I admit eating the same leftovers can be a little boring.  On Christmas Eve there was an abundance of leftovers and one of the things leftover was a turkey. Since there wasn’t much turkey leftover at Thanksgiving, I decided to whip up a quick turkey pie for dinner and to put one into the freezer to have another night within the next couple months.

My go to turkey pie recipe is something my mother always made. We like to keep it simple because sometimes simplicity is its best. Growing up whether my mother made our turkey pies or purchased them we’ve always had pies that didn’t have a bottom crust to them  The great part is this recipe takes under 10 minutes to put together and then it’s into the oven or freezer.

Serves 5. 8 Points Plus Values.
Ingredients:
  • 9 oz. cooked turkey breast, without skin, cut into small chunks
  • 1 can diced peas and carrots
  • 1 ½ cans (roughly 2 cups) of Campbell’s turkey gravy (I prefer Campbell’s because it’s nice and thick in consistency)
  • 1 Pillsbury Pie Crust (whole round sheet)

Preheat oven to 350 degrees.

Remove pie crust from the refrigerator and let sit out at room temperature for a few minutes.

In a round disposable metal pan or round metal pie pan toss together turkey, peas & carrots and canned turkey gravy.  When the mixture is well combined, unroll pie crust and gently place over the filling. Gently fold the outer edges in to create a crust.

Cut 2 slits into the top of the pie to help the steam escape.

Place into the oven and bake for 30-40 minutes until the crust is nice and golden brown.


Sunday, December 29, 2013

Spaghetti Squash Bake with Turkey Meatballs

I have developed a true love for spaghetti squash, although I will admit having it the same way over and over again can get a little redundant and boring. So with that I ended up switching it up a bit, using the same ingredients but adding some cheese atop. It turned out absolutely perfectly. The spaghetti squash crisped up just slightly on the outside and the cheese was a perfect touch. Considering this was using some of my leftover meat sauce I had made it was also a great way to use up some leftovers in a new and unique way.

My meatballs are actually frozen turkey meatballs from Trader Joe’s.  I pick these up every once in a while at Trader Joe’s because my boyfriend and I just genuinely like these! I’m usually not a frozen meatball fan (I prefer homemade) but these are tasty and perfect for a quick meal. I’ve heard from a few that the sodium level is too high for their liking – but I feel as though these aren’t an item I eat all the time, so a higher sodium level isn’t going to be a damper.

To make my spaghetti squash bake, I layered spaghetti squash into the bottom of a small baking dish. I layered ½ cup of homemade meat sauce over the top, then sprinkled the top with 1/3 cup of fat free mozzarella.  I then baked it in the oven for roughly 15-20 minutes until the cheese was nice and melted.

The greatest part was my entire meal was only 9 points plus!

QUESTION:
Have you ever had spaghetti squash bake?

Weight Watchers Your Success Kit Haul

Every time Weight Watchers comes out with a new plan (this year it’s “Simple Start”) the new products roll out as well. I purchased the kit last year primarily for a few of the items within the kit … and this year the same thing went for the Your Success Kit!  Although there were a large number of items I was looking forward to giving a try.

The first thing that drew me in was the bag – which doubles as a lunch bag.  They come available in 3 shades – a zebra print with a brown flap, a gorgeous psychedelic pink with swirls running throughout it, and a classic blue plaid. I went back and fourth, for what seemed like an eternity, and decided on the plaid. I truly wanted the pink but decided to play it on the “safer” side of the fence.

The second thing that drew me in was the cookbook.  I am a sucker for Weight Watchers cookbooks … but the fact this cookbook was geared more towards simple start/simply filling I was intrigued. Simply filling (or as it’s being coined now: simple start) has always been an option with Weight Watchers. Many members follow that portion of the program and have found success with it. I’ve never dabbled in it for a few different reasons – one of those reasons being figuring out a menu which would be enjoyable for all in my family. With a cookbook, I could gather ideas and make it simpler than going to the drawing board with a blank mind.

The third item that drew me in was the Find Your Fingerprint book. This book is very much like the success book which was available in the prior kit. It’s a book that has available spaces to write in answers to the questions being posed regarding your individual successes/speed bumps/etc. It’s like a Mad Lib but a serious one which is coined towards your individual success regarding your weight loss. The prior success book pulled me out of a slump I was going through the prior year so it’ll be a fun learning tool to use this time around.

The fourth item which really captured my attention was the steaming bowl. I’m a sucker for kitchen gadgets (the collapsible measuring cups totally sold me last time around!) so this was pretty exciting. Being able to bring fresh veggies with me on the go, adding a bit of water to the bowl and having them freshly steamed for me? Score!

The final item that truly sealed the deal for me was the pack of workout “playing cards”.  This is an ingenious little tool to include in the kit. It’s your “classic” playing card which lists the area the workout will target, while when you turn the card over, it demonstrates and explains a workout to target that area of the body.  The workouts can be done anywhere – at home, at the gym, on the go, etc. It really pulls away the excuse to workout, even for 10 minutes, from the comfort of your own home.

Of course there are the staple Points Plus value stickers and Power Food stickers, the $45 worth of coupons (that can be used in your grocery store or WW meeting location – a coupon being for a free calculator and calculator sticker cover [which if you already have you can get a free box of bars … but I feel a free cookbook or something would’ve been a better incentive]), and the 12-week Plan & Track book.  The Plan & Track books are being sold separately at meeting locations for those folks who paper track. I happen to be an online or mobile device tracker, so this is something I’ll keep around and perhaps one day dust off and give paper tracking a go.

So far, I’m happy with my purchase.

QUESTION:
Have you or are you planning on purchasing the your success kit?

Tortilla Pizzas

Pizza is undoubtedly one of my favorite foods. I’ve made pizza like this for myself in the past, but on the night I made these, I was glad I had tortillas on hand. Why? Well, I purchased the wrong prepared pizza crust (I wanted the thin crust but bought regular crust) so I made a pizza for my boyfriend and made a “point comfortable” pizza for myself – or rather TWO pizzas! The only thing I was missing was the classic thick pizza crust, but nonetheless the flavor was there and that’s all that matters!

Making tortilla pizza is truly simple and they can be versatile depending on the flavors you’re looking for. I’ve used bell peppers, onions, banana peppers, turkey pepperoni, turkey sausage and hamburger. This time around I used fresh bell pepper, fresh red onion, and turkey pepperoni. I garnished it wit a sprinkle of oregano and a tiny dash of garlic powder.

I used ¼ cup of Barilla Traditional Pasta Sauce on each tortilla round and split 1/3 cup Kraft fat free shredded mozzarella over each tortilla, then doctored up with my pepperoni and veggies.

The greatest part? Both pizzas were only 6 points plus values.

QUESTION:
Do you like homemade lower point/calorie stabs at pizza?

Friday, December 27, 2013

Trader Joe’s Mini Gingerbread Men

Aaahhh … Trader Joe’s Mini Gingerbread Men cookies! One of my FAVORITE limited edition snacks at Trader Joe’s this time of the year! I first stumbled upon these cookies last year while shopping. I originally wasn’t sure I’d like them, but one of the employees at the time graciously opened the pack to let me sample … and I was sold. So sold, that I picked up another box this year!

The cookies are miniature gingerbread men which definitely have a gingerbread flavoring to them. They’re not as overwhelming as some gingerbread cookies can be, but these do have an underlying ginger flavor that is noticeable on the palette especially as you’re chewing and/or are done chewing. The cookie is crispy, yet as you chew it, it’s got a bit of a slight chewiness to it. The backside of the cookie has a white fudge icing on it to give it a hint of sweetness. I will say these can be a bit of double hitter – meaning you want to eat more than the serving size.  I’ve found when I take out my cookies, I shove them into the way back portion of the cabinet and work on “forgetting” they are there.

A serving is 3 cookies, which is 120 calories of 3 points plus values.

QUESTION:
Have you ever tried Trader Joe`s Mini Gingerbread Men?

Sandwich Bros. Turkey Sausage & Cheese

A number of month’s back I noticed these little frozen sandwiches that popped up on my local grocery stores freezer shelves. There are occasions where I enjoy convenience foods either as a meal or for a quick snack.  After trying the Angus Burgers and Gyro’s I was in the breakfast mood during my last trip through the store and opted to pick up the Sandwich Bros. Turkey Sausage & Cheese.

As with all the Sandwich Bros. line the sandwiches come in small moderately thick pita bread. The sandwiches are cut in half, with the top of the pita bread having space to add condiments (if you wish) to your sandwich. Taste wise I find these to be perfect – the cheese is your average yellow American cheese, while the turkey sausage is reminiscent of a pork sausage patty. The sandwiches themselves come individually wrapped and after a 40-45 second trip in the microwave (wrapped in a napkin) your sandwich is piping hot and ready to eat. They’re a perfect size for a snack, but they’re also a great addition to a meal alongside some fresh fruit or even a Greek yogurt.

A serving, 1 sandwich, is 140 calories or 4 points plus values.

QUESTION:
Have you tried any of the Sandwich Bros. products?

Thomas’ Limited Edition Cranberry English Muffins

After trying out the Thomas’ Limited Edition Cranberry Bagels I decided to give the Thomas’ Limited Edition Cranberry English Muffins a try.  I admit bagels are more of my “thing” over English muffins, but I do enjoy a good English muffin now and again.

Thomas’ comes out with limited edition products based on the season. As we know with winter/Christmas … cranberry is all the rage. The one major difference I noticed is the cranberry bagels have a slight sweetness in taste and smell to them (they smell along the line of a blueberry bagel).  Whereas the cranberry English are along the tarter side of the equation and have a rather distinct cranberry scent to them. Texture wise they are your classic English muffin, which has a flakey soft inside, which thanks to the cranberries is slightly moist.  They toast up perfectly and are tasty with a bit of spray butter or even cinnamon butter on them.

A serving, 1 muffin, is 150 calories or 4 points plus values.

QUESTION:
Have you tried any of the Thomas’ Limited Edition products?

Cabbage, Beet and Onion Salad

Cabbage, beet and onion salad is a dish my mother made often growing up. It was a very simple salad, but it was a perfect complimentary meal against certain dishes. The salad itself is simple, refreshing, tart, crisp and even a perfect meal on its own or alongside dinner.

Typically I would use a head of cabbage, but since I was looking for something quick I opted to pick up a bag of coleslaw mix. I would recommend picking up a bag of shredded cabbage (without carrots) but since coleslaw mix with carrots is all that my grocery store had available, it’s what I picked up. The carrots don’t necessarily change the dish it just gives it a different crunch.  Nonetheless it’s delicious and typically a crowd pleaser.

I enjoy this the day I make it, but I feel it tastes so much better the next day because it gets to “marinate” in the refrigerator. The cabbage also softens up a bit.

Serves 7. 1 Points Plus Values. ~3/4 cup serving.
Ingredients:
  • 1 bag of coleslaw mix OR 1 small head of cabbage, sliced thin
  • ½ small onion, sliced
  • 8 oz fresh beets (or canned), sliced
  • 4 tbsp Red wine vinegar (or less depending on taste)
  • 1 tbsp olive oil
  • Pepper, to taste
  • Salt, to taste

Add coleslaw mix, sliced onions and sliced beets to a large bowl. Sprinkle with black pepper and a dash of salt.

Drizzle in olive oil and red wine vinegar. Toss to combine.

The beets will change the color of the salad to a slightly purple shade.  Taste test and adjust seasonings (salt, pepper and red wine vinegar).

Thursday, December 19, 2013

Bailey's Walnut Fudge


Every year at Christmas time I make fudge to give to family and friends as a “thinking of you” type of gift.  This is my "go-to" Bailey's Walnut Fudge recipe. It's delicious, sweet, nutty with a mellow hint of Bailey's in the background. This fudge is very smooth and creamy and a piece is enough to satisfy any sweet tooth.
If you are going to try this recipe do keep in mind this makes a large 13x9 pan of fudge.
I put my recipe into the Recipe Builder on Weight Watchers and I throw in the amount of fudge pieces I end up with to figure out the points.  Typically I end up with 4-5 Point Plus Value pieces of fudge.
Now onto the recipe:
4 1/2 cups granulated sugar
1 (12 ounce) can evaporated milk
1/2 pound butter
2 (12 ounce) packages milk chocolate chips
1 (12 ounce) package semisweet chocolate chips
4 cups mini marshmallows
2 teaspoons vanilla extract
2/3 cup & 2 tbsp Bailey's
2 cups chopped walnuts

Pour chocolate chips, 4 cups mini marshmallows, vanilla extract, Bailey's and walnuts in a very large bowl. Set aside.

In a medium sauce pan, place the butter, sugar and evaporated milk into the pan.
Cooking on medium/high to medium heat, bring the mixture to a boil (don’t forget to stir it).

Once you start to see bubbles forming set your timer and cook for exactly 11 minutes (depending on how it’s boiling you can lower your heat setting a little from medium-high to medium), stirring constantly.   Make sure you stir constantly or it WILL burn on you.
Once done, pour your hot liquid mixture over the ingredients in the bowl and stir slowly to blend using a metal spoon.
Right before your mixture until it's set.
Pour into a buttered 13 x 9-inch pan and chill very well. Cut when cold.

Spinach Dip


I had some spinach to use up, so I decided to do a quick Google search to find out what I could make with it. Originally I wanted to make a spinach pasta dish my mother made when I was younger … but in all honesty, I cannot remember exactly what it was, and when I asked her she couldn’t recall. I found a Hot Spinach Dip recipe from Skinnytaste’s website see here.

Looking over the ingredients I realized I didn’t have all of them and I felt it would be wasteful to go to the store just to buy the items I was missing … so I decided to shake it up. It came out perfectly! I ate it for a few days and even shared some with my mother and her friend, who in turn asked me how I made it so they could make it at home.  This will become a staple recipe for me because it makes for a perfectly filling snack.

Serves 5-10. Serves 10: ¼ cup serving, 2 points plus values. Serves 5: ½ cup serving, 3 points plus values.
Ingredients:
  • 10 oz frozen spinach, dry (all liquid squeezed out)
  • 1 small onion, diced
  • 1 tbsp minced garlic (I used jarred garlic)
  • 5 tbsp light mayonnaise
  • ½ cup light sour cream
  • 2 1/3 tbsp reduced fat parmesan cheese
  • 1 cup fat free shredded mozzarella cheese
  • ½ tsp garlic powder
  • Black pepper, to taste
  • Salt, to taste

Place diced onion in a microwave safe bowl, add 1 tbsp of water and microwave for 30-40 seconds until onions are translucent.

Squeeze all liquid out of the spinach and place into a bowl.  Add in cooked onion, garlic, mayonnaise and sour cream. Mix until all ingredients are combined.

Sprinkle in parmesan cheese, salt, pepper, garlic powder and shredded mozzarella cheese. Blend until combined.

Cover mixture and let marinate in the refrigerator for at a minimum 1 hour.

Preheat oven to 350 degrees.  Place dip into baking dish which has been sprayed with non-stick cooking spray.

Bake for 15-20 minutes until cheese is melted and the edges are golden brown.

Tuesday, December 17, 2013

Sautéed Bananas w/ Salted Caramel ice cream

This has been my favorite dessert this past week! And by favorite I mean I have had it every single night. But I can say (proudly/sadly?) that this love affair has ended momentarily because we are out of the salted caramel ice cream and we don’t have very many bananas left. I’m saying this is a good thing because 1) I don’t want to get sick of it and 2) I have other items to enjoy.

This is truly a very simple dessert to whip together. The first night I made myself one, my boyfriend walked into the kitchen and wanted bananas with his ice cream.

I spray a non-stick pan with Pam then place the pan over medium-high heat. I break up a banana into smaller pieces and allow them to start to brown up a tad. I sprinkle the top with cinnamon and just start cooking it, while stirring it all together so it doesn’t burn. When done (it’ll be a nice golden yellow color) I place it into the bottom of the bowl and top with a ½ cup of ice cream of my choice.

The particular ice cream I have been loving with this combination is the Edy’s (or Dreyer’s) Limited Edition Salted Caramel Ice Cream. The ice cream has caramel swirls in it while it also has pieces of salty pretzel in it. That salty combination with the sweet bananas is just money. I realize this is limited edition and was released around summer/fall time but I’ve still seen this sold at Target locations.

The greatest part? This entire dessert is ONLY 3 points plus values!

DiGiorno Pizzeria! Bianca/White Pizza

Pizza is one of my favorite foods and lately my boyfriend has been on a frozen pizza kick. While shopping at Walmart, I spotted the DiGiorno Pizzeria! Bianca/White Pizza and decided to get it for myself to try.  One day after running holiday errands with my mother, in order to avoid going out to eat, I suggested I make this pizza … and that’s what we did.

I cooked the pizza in my convection oven and when done, cut it up into 8 slices. The pizza has the classic DiGiorno Pizzeria! crust which is thicker but not as thick as classic DiGiorno. The pizza is described as having mozzarella and ricotta cheeses, spinach, garlic, cream fraiche sauce and olive oil on it.

I am quite a fan of the Pizzeria line, but I have to say this particular pie looked a lot better straight out of the oven than it did in the taste category.  It’s not horrible, but it’s not the best spinach pizza I’ve had (I prefer Ristorante) and it’s certainly not one of the best Pizzeria line options (I prefer the supreme). There are hints of mild garlic running throughout the pizza but for the most part it was on the plain side. I realize spinach and ricotta are rather bland foods, but I’m a stickler when it comes to seasoning foods to help increase the flavor category. This just didn’t hit that note for me. My mother didn’t enjoy it, she ate her 2 slices and didn’t want anymore.

A serving is ¼ of the pizza and is 320 calories or 9 points plus values.

QUESTION:
Have you tried any of the DiGiorno Pizzeria pizzas?

Monday, December 16, 2013

Quick dinner: Spaghetti squash w/ sauce & turkey sausage crumbles

I’ve been on a spaghetti squash kick as of late. One night I was hungry and decided to whip this together in less than 2 minutes.  Lunch or dinner in less than 2 minutes is a perfect way to go! Of course it can only be ready in less than 2 minutes if you have cooked spaghetti squash on hand.

In this particular instance, I used jarred sauce (1/2 cup Barilla Traditional pasta sauce), ¼ cup Jimmy Dean Turkey Sausage Crumbles and a serving of cooked spaghetti squash. I put everything together and heated it through in the microwave.  Filling, delicious, and a perfect quick meal.

The greatest part? This whole meal was ONLY 2 points plus values!

Jimmy Dean Delights Breakfast Bowl Southwest Style

While doing some grocery shopping at Target, I spotted a new item – the Jimmy Dean Delights Breakfast Bowl Southwest Style.  I’ve tried some Jimmy Dean Delights in the past and have found them to be a decent breakfast item to grab while on the go, or do heat up when in a pinch.  Since I’ve been on an egg kick as of late, I decided to give this a try because it looked good.

I can say, I am glad I did because this is delicious!  It’s packed with flavors, protein and veggies and just a great breakfast experience. It has egg whites, chicken chorizo sausage, onions, peppers, cheese, black beans and potatoes in it.  The black beans are definitely a fabulous addition to this dish and it helps give it a different texture in the mix. It’s not spicy, it’s flavorful and really just a great mix of all ingredients. I found it to be perfect with a side of toast or even a tortilla.

A bowl is 250 calories or 6 points plus values.

QUESTION:
Have you tried any of the Jimmy Dean Delights Breakfast Bowls?

PopChips Salted Caramel

I spotted a new PopChips flavor on the shelf at Target, so I opted to pick it up. PopChips Salted Caramel it sounded interesting because I’m becoming more and more a fan of salted caramel items.  I had these tucked away in the cabinet and pulled them out one day when I was in the mood for something crunchy but something sweet.

After opening the bag … I have to say I was rather let down. The chips tasted more along the lines of a sweet kettle corn. I got the minor hint of caramel, but there was truly no real “salted caramel” in there. I was aiming for that sweet caramel flavor that also brought fourth a salty bite. The chips themselves are classic PopChips but the flavor on these just wasn’t there which is why it was such a let down. I ended up giving the bag away because I wasn’t going to make myself have to eat them because I purchased them.

A serving is 1 ounce (roughly 16 chips) and is 130 calories or 3 points plus values.

QUESTION:
What is your favorite PopChips flavor?

Sunday, December 15, 2013

Nestle Fat Free Hot Cocoa

I’ve been searching high and low for the Nestle Fat Free Hot Cocoa but continuously came up empty handed because for some reason Swiss Miss is the hot cocoa mix of choice on many grocery retailers’ shelves.  I specifically wanted to pick this up because it’s more of a guilt free hot cocoa in comparison to other brands. I found this in my local grocery store one afternoon because they brought the brand in because they were completely out of Swiss Miss diet and sugar free.

Since it was a very cold night, I decided to make myself a cup of hot cocoa. I boiled my water, emptied the cocoa package into my mug. When done I stirred it up and gave it a sip … and was pleasantly surprised.  The cocoa is chocolately but it’s not creamy – so if you’re looking for something as creamy as say a Swiss Miss you won’t find it here. Considering the nutrition facts I’ll take it because it’s one of those products that can curb a chocolate craving.  I’ve also been told this is great to add to coffee to help sweeten it up without needing to add sugar/creamer. While I’ve heard it’s also good to incorporate with whipped cream or yogurt. I plan on giving that a try sometime soon!

A single packet is 20 calories or 0 points plus values.

QUESTION:
What is your favorite hot cocoa mix?

Wednesday, December 11, 2013

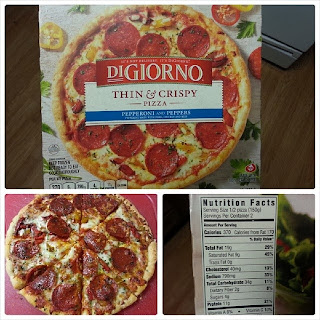
DiGiorno Thin & Crispy Pepperoni and Peppers Pizza


Pizza is one of my favorite foods, so I like to keep frozen pizza on hand incase dinner/lunch plans go array.  This past weekend I really felt like pizza so I opted to pull out a new pizza to give it a try.  While grocery shopping a few weeks ago I purchased the DiGiorno Thin & Crispy Pepperoni and Peppers Pizza.

I was surprised to see a true thin crust pizza on the shelf by DiGiorno. I realize there are frozen pizza companies that sell “thin crust” pizzas which truly aren’t what thin crust pizza is supposed to be. What interested me even further is that the pizzas for the most part contain 2 servings.  I opted to go with the pepperoni and pepper figuring my boyfriend would share it with me (which he did).

The pizza itself is pretty good. The sauce although isn’t what I typically expect from DiGiorno (or perhaps their Pizzeria! line has totally spoiled my taste buds).  It’s mediocre in the sauce department, meaning it tastes more on the plain side than packed with flavor and seasoning.  Topping wise it’s on point. There’s a good amount of cheese and the pepperoni and peppers are plentiful and are scattered over the whole pizza.   The crust is thin, but thick enough to give you a nice moderately puffy crust (which is my favorite)!. Size wise, it’s smaller than an average DiGiorno pizza, it’s about the size of a medium pizza.  Alongside a side salad it’s a perfect meal.

A serving is ½ the pizza, which is 370 calories or 9 points plus values.

QUESTION:
Have you tried any of the new DiGiorno thin and crispy crust pizzas?

Monday, December 9, 2013

Jamaican Jerk Pork w/ Carrots & Roasted Butternut Squash

Whenever I have a pork roast out to cook … it ultimately means one thing: Jamaican Jerk Pork. I can’t think of making anything else with it (I mean I could, but pork roast and jerk seasoning go together like flour and water in my book) and it’s one of those dishes that I love and enjoy quite a lot.

For my plate, I decided to cut out the carb (rice) so I went with fresh steam carrots and a roasted butternut squash, which I seasoned up with some spray butter and a tablespoon of brown sugar.

The whole dish was perfect. Filling, fresh and packed with flavors.  I’ve learned the trick with jerk pork or chicken is to use a very small amount of seasoning (incase you’re wondering I use the Mild Grace Jamaican Jerk Seasoning). The seasoning itself is packed with flavor and spicy pepper so a small amount will pack on the flavor but not make it too hot to handle.  The sweet squash helped balance out the flavors. Ultimately it was a wonderful dish and a perfect dinner.

The greatest part it was only 7 points plus values (1 for the brown sugar, 6 for 4 oz of pork)!

Sunday, December 8, 2013

Turkey Sausage Stuffing


Stuffing is one of those foods that I look forward to on Thanksgiving. Since it’s my favorite dish and since I’ve been told in the past I make a pretty mean stuffing … I was tasked with making the dish again this year.  In years past I’ve used boxed stuffing (just the plain dried bread pieces) and I’ve also used homemade cornbread, etc. My personal favorite has been the cornbread turkey stuffing, but since my mother isn’t a huge fan of it … I decided to try a different route this year to make all happy.

The stuffing turned out quite well. It was delicious, meaty, filled with delicious filling and spiced just perfectly. As mentioned previously I’d have loved it a whole lot more if it were a cornbread variety … but maybe next time!

12 servings. 4 Points Plus Values. ½ cup serving.
Ingredients:
  • 17 slices Light Italian bread (I used Market Basket store brand), dried
  • 16 oz Jennie-O Turkey Breakfast Sausage
  • 1 large onion, chopped
  • 4 ribs celery, chopped
  • 2 tbsp Smart Balance Light Butter
  • 4 cups fat free chicken broth
  • 1 tsp black pepper
  • ¾ tsp salt
  • 7 tsp salt free Bell’s Seasoning (I enjoy a bold stuffing flavor, feel free to cut this into 1/3’s and taste testing to your liking)

The day before set the bread out to dry, making sure to flip each slice over halfway through the drying cycle. You can speed this process up by putting it into the oven to dry up – but be careful as it can burn.  I found a good 12-hours and it was perfectly dry.

Cut dried bread into smaller cubes. Set aside.

Preheat oven to 350 degrees.

In a large non-stick skillet, over medium-high heat melt the butter. Once melted add in the chopped onions and celery. Stirring frequently, cook until the onions and celery are translucent. Transfer cooked mixture to a bowl and set aside.

Using the same skillet, cook the turkey breakfast sausage over medium high heat. Break up sausage into bite sized pieces as the meat cooks.  The sausage will release some liquid; make sure to drain the liquid off to help get some searing on the sausage bits.

Add the onion and celery mixture back into the pan, toss to combine. Sprinkle with salt, black pepper and half the Bell’s seasoning. Stir to combine, then begin adding in large handfuls of the dried bread pieces - incorporating with the meat and vegetable mixture.

In ½ cup measurements, pour the liquid over the stuffing mixture and stir to combine until all ingredients are incorporated.

Sprinkle with remaining Bell’s seasoning, stirring to combine.

Transfer stuffing mixture to a non-stick casserole dish. Bake until the top is crisped – roughly 20-25 minutes.

Friday, December 6, 2013

Quick & Easy Vegetable Fried Rice


A few weeks ago I needed a quick side dish to go along side some satay peanut chicken. Since potato and plain rice wasn’t my idea of ideal I poked through the cabinets and decided to make a quick vegetable fried rice. Since I didn’t have frozen vegetables on hand I used a few canned vegetables along with a packet of fried rice seasoning mix.

Overall the dish came out perfect. It was packed with flavor, was filling and it made for a pretty large and in charge serving. It was definitely far more satisfying than a vegetable fried rice I could have ordered from any Chinese food restaurant.

I didn’t have any scallions (green onions) on hand but when I make this again I will definitely be adding those to the dish. The scallions would not only give it color but it would give it a complimentary mild onion flavor which I love.

Of course I used peas, carrots and water chestnuts but ideally you could make this exact recipe with anything you enjoy. Bean sprouts, onions, egg, etc., and you could even add a protein of your choice to it to make it a meal instead of a side dish.

5 Points Plus Values. Serves 6. 1 ¼ cup serving.
Ingredients:
  • 4 cups cooked white rice, room temperature
  • 15 oz canned peas & carrots, drained
  • 1 packet Fried Rice Seasoning (I used Sun-Bird)
  • 8 oz can whole water chestnuts, drained and chopped into quarters
  • 2 tbsp reduced sodium soy sauce
  • 4 tbsp water
  • 1/3 cup baby corn, cut into smaller chunks

Spray the bottom of a nonstick skillet with Pam. Add in white rice and let heat through, crisping up slightly.

In a small bowl mix together water, soy sauce and fried rice seasoning packet.  Once well incorporated pour over rice and mix together until rice is coated with seasoning.

Add in canned peas & carrots, baby corn and water chestnuts. Stir to combine. Allow the mixture to heat through for 2-3 minutes (just enough for the vegetables to warm) before removing from the flame.

Serve and enjoy!